Setting Up a CO2-Injected Aquarium
This walkthrough of how to set up a CO2-injected aquarium will proceed from the CO2 tank to the fish tank.
Safety First
The CO2 in the tank is actually a liquid, and it will exit from the tank as a liquid if the tank is not vertical. This can ruin your regulator (and probably do all sorts of other bad things as well). Make sure that the tank is secured in an upright position.
It's also worth noting the CO2 is an asphixiant, and it's heavier than air. If you get a significant leak, it's conceivable that a layer of CO2 could build up on the floor around the tank. If anyone is going to be sleeping on the floor near the tank, it's probably best to shut it off at the tank.
The people at the welding shop have a nasty picture of a car that was blown apart by a compressed gas cylinder, and there are stories of overfilled tanks venting in cars and houses when they warmed up. I'm always sure to keep the windows down and to drive carefully when I have a CO2 tank in the car.
In short, it's best to be careful and give a lot of thought to any system that uses compressed gas.
Connecting the Regulator to the Tank
The CO2 in the tank is at about 800 PSI, so if you don't have a really clean, tight connection between the regulator and the tank, you can loose a lot of CO2 by leakage.
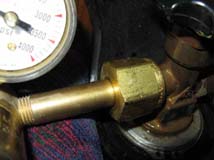
 I start by cleaning the threads on the CO2 tank with an old toothbrush. Next, I crack the valve slightly to let some CO2 escape and blow out any crud that's in the opening. This sounds kind of unsafe, but it's standard practice when hooking up high pressure tanks. If you have a nice new tank that comes with an aluminum foil seal over the outlet, you might be able to skip this step. I get my tanks from a welding supply house and they are seldom pristine, so I do the cleaning steps. I start by cleaning the threads on the CO2 tank with an old toothbrush. Next, I crack the valve slightly to let some CO2 escape and blow out any crud that's in the opening. This sounds kind of unsafe, but it's standard practice when hooking up high pressure tanks. If you have a nice new tank that comes with an aluminum foil seal over the outlet, you might be able to skip this step. I get my tanks from a welding supply house and they are seldom pristine, so I do the cleaning steps.
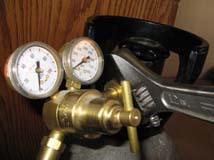
Make sure the plastic washer in the regulator is in good shape--if it isn't you won't get a good seal. Ask for a new one at the CO2 supplier. I tighten the nut on the regulator with a 12" crescent wrench.
 Opening the Valve Opening the Valve
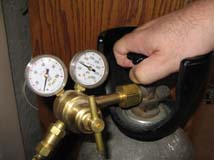
When the nut is tight, you can open the valve, but first check to make sure that the adjusting screw (the screw that regulates the regulator's output pressure) is screwed out so no gas flows from the regulator.
There's a time-honored tradition for how to open the valve: you stand away from from the regulator in case the glass in the dials blows out. I don't know how often this happens (or if it ever does) but it seems like a good idea.
Slowly open the valve on the tank. Note that the pressure on the high pressure gauge now reads about 800 PSI. If you have unscrewed the adjusting screw, the pressure on the low pressure gauge should still be zero.
Note: You may be tempted to open the tank valve only a small amount. If you do, it may reseat and cut off the flow of gas a few hours later. Be sure to open the tank valve sufficiently to assure continuous flow and to verify flow during the first day of operation.
Checking for Leaks
Now is the time to do your first leak check. Naturally, since the pressure at the tank is 800 PSI, this is where leakage can be the biggest problem.
 You can get commerical leak-checking solutions (they used to use something called "Snoop" for this at a lab I visited), but soapy water works fine. The idea is to spray, daub, or pour enough soapy water onto the connnections so that if there's any leakage, bubbles appear. If you get bubbles, you can try tightening the connection. If that doesn't work, try dismantling things (Shut off the tank valve first!), inspecting, cleaning, and reassembling. If it's still leaking, the best course may be to talk to your supplier. You can get commerical leak-checking solutions (they used to use something called "Snoop" for this at a lab I visited), but soapy water works fine. The idea is to spray, daub, or pour enough soapy water onto the connnections so that if there's any leakage, bubbles appear. If you get bubbles, you can try tightening the connection. If that doesn't work, try dismantling things (Shut off the tank valve first!), inspecting, cleaning, and reassembling. If it's still leaking, the best course may be to talk to your supplier.
Even if all goes well with your leak check, you may want to check again after a few hours, especially if the tank was cold. A small leak can empty a tank surprisingly quickly. You may want to also check the fittings and connections downstream on the low-pressure side of the system.
Turning on the Gas and Adjusting the Pressure
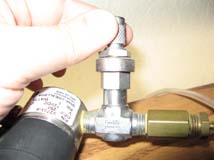
You get the gas to flow and set the output pressure with the adjusting screw, which is usually a rod-shaped handle set on a screw between the gauges.
 On my regulator, you turn the adjusting screw clockwise to turn on the gas and increase the output pressure. Regulators are said to work better when they are not at the bottom of their range. I set mine to about 12 to 15 PSI, but that's partially because my solenoid valve (which is rated for only 5 PSI) that is controlled by my pH meter can lock up at higher pressures. On my regulator, you turn the adjusting screw clockwise to turn on the gas and increase the output pressure. Regulators are said to work better when they are not at the bottom of their range. I set mine to about 12 to 15 PSI, but that's partially because my solenoid valve (which is rated for only 5 PSI) that is controlled by my pH meter can lock up at higher pressures.
The output pressure often needs to stabilize for a while when the system is first set up. Be sure to check it again a few hours later.
Adjusting the Metering Valve
Assuming that the solenoid valve is on and gas is flowing, you should be seeing bubbles at the output in the tank.
 Adjust the metering valve to get the desired number of bubbles per minute. I set my bubble count so that even if the CO2 stays on all the time (like if the solenoid valve sticks or the pH meter/controller has a problem) the CO2 will just go to a high but non-toxic level in the tank. Adjust the metering valve to get the desired number of bubbles per minute. I set my bubble count so that even if the CO2 stays on all the time (like if the solenoid valve sticks or the pH meter/controller has a problem) the CO2 will just go to a high but non-toxic level in the tank.
|