Building the Simplest Possible pH Meter
Build a digital pH meter that you can use instead of an expensive industrial ph
meter or benchtop ph meter for a fraction of the cost.
How the pH Meter Works
You can build a simple digital pH meter with just an inexpensive operational amplifier
("op amp") IC (a TL082 Dual JFET-input IC, about $2.00), 2 batteries, a digital
volt meter, and a pH probe (mine's a
Pinpoint brand probe that I got from Amazon.com for about $40).The TL082
(or any other operational amplifier with a high impedance input) works as a unity
gain buffer between the high impedance of the pH probe and the digital multimeter.
Schematic Diagram of the pH Meter
Here's the simple schematic diagram of the pH meter circuit. Two 9-volt batteries
power a high-input-impedance operational amplifier, such as a TL082. The pH probe
of the meter is connected to the non-inverting input. The output voltage (V out),
which is directly proportional to pH, is read with a voltmeter.
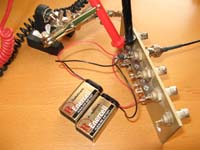
View of the pH Meter Circuit
Here's a view of the entire pH meter circuit.The IC is mounted directly to a BNC
panel connector.
Pictorial View of the pH Meter
This diagram shows the physical layout of the meter.
A digital
voltmeter is connected to ground and pins 6 and 7 of the op amp, which are
shorted together. In this circuit, pins 1, 2, and 3 of the IC are not used.
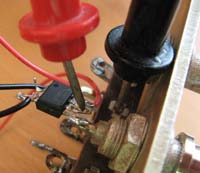
Close-Up View
This pH meter circuit is so small and so simple that no circuit board is required.
In this prototype, the IC is soldered directly to the BNC panel connector.
Calibration and Use of the pH Meter
In theory,
a pH probe produces about 59 millivolts (mV) per pH unit, and at pH 7 (neutral
pH) the probe produces 0 volts. Acid pHs produce negative voltages. Basic pHs produce
positive pHs. For example, the system shown here reads +7.6 mV with the inputs shorted
(due to the input offset error of the op amp). With the probe in pH 7.01 calibration
buffer, the voltage is +4.6 mV. With pH 4.00 calibration buffer, the output voltage
is 168.8 mV. This gives a range of 168.8 - 4.6 = 164.2 mV for 3.01 pH units, or
54.55 mV per pH unit.
If, for example, I measure 100 mV, the pH is 100 mV / 54.55 mV = 1.83 pH units deviation
from 7.01, so I subtract 1.83 from 7.01 for a pH of 5.18. Creating a graph or a
programming a calculator to do the arithmetic makes the process of determining pH
simple, if not quite as simple as reading it off a benchtop pH meter's display.
Graphing the Results
Here's a graph of pH and voltage from the calibration of the setup described here.
pH Circuit for Arduino
Finally, and even simpler, if you are looking for a way to connect a pH probe directly
to Arduino without building your own circuitry, you can buy a complete
pH development kit for Arduino with a pH probe, calibration
solutions, and pH-Stamp circuit for about $100. The
pH-Stamp, which you can also buy separately, is a complete
pH monitoring system that enables you to accurately monitor pH without having to
add any additional circuitry or components to your design. Communication with the
pH-Stamp is done with 11 simple commands. It provides scientific-grade readings
to any embedded system that has an RS232 connection interface (voltage swing 0-VCC,
not +/- 12 volts).